安装开发环境帮助文档
文档假设安装环境为 MacOS 或者 Linux(在两个系统有差别时会分标题列出),在安装过程中,请同时参考 gitlab-development-kit 官方文档。
前期准备
MacOS
请确保以下工具正确安装
- homebrew
- 最新的 Xcode 和 Xcode Command Line Tools
- 确保你的机器可以正常访问必需的海外技术资源
- git,建议升级 brew upgrade git
- make
- mise
Linux
请安装好下列前置依赖:
bash1sudo apt install build-essential git graphicsmagick-imagemagick-compat libreadline-dev sqlite3 \
2libsqlite3-dev libre2-dev build-essential zlib1g-dev libyaml-dev libssl-dev libgdbm-dev libre2-dev \
3  libncurses5-dev libffi-dev curl openssh-server libxml2-dev libxslt-dev \
4  libcurl4-openssl-dev libicu-dev logrotate rsync python-docutils pkg-config cmake \
5  libkrb5-dev libcurl4-openssl-dev libexpat1-dev gettext libz-dev libssl-dev libpcre2-dev git-core \
6  postfix libgpgme11-dev ruby-gpgme
其中,Postfix 可选 Local 配置。
如果在接下来的步骤中遇到了依赖问题,可以参阅Gitlab 在 Linux 上的依赖和搜索错误信息(放轻松啦,Linux 就是这样子的啦,哪有一帆风顺的,饮茶压压惊先)。
克隆 git-development-kit 代码库
这个代码库包含着 setup gitlab 环境的代码,不包含 gitlab 的相关代码。
使用下面命令 clone repo 到 gdk 文件夹 (没有使用 gitlab-development-kit 的名字,而是起了别名)。我喜欢用 ssh 的 url,也可以换成 https
bashgit clone git@gitlab.com:gitlab-org/gitlab-development-kit.git gdk
请注意:
- 不要把 gdk repo 放到嵌套太深的文件夹中,因为后期会用到一些 socket 文件,而 socket 文件有 100 字符的限制,嵌套太深的文件夹很容易超出限制导致报错,推荐放到类似 /Users/xxx/work/gdk
- clone repo 之后不要轻易地修改 gdk 的文件夹名字,不少配置都是根据 clone repo 的名字生成的,修改之后很容易出错。
配置 GDK 使用 mise (asdf 已弃用)
bash1cat << EOF > gdk.yml
2---
3asdf:
4   opt_out: true
5mise:
6   enabled: true
7EOF
Bootstrap
MacOS
进入 gdk 文件夹,运行下面命令进行安装:
bashgdk_debug=true make bootstrap # 会安装 ruby,go,node 等等
环境变量 gdk_debug 可以查看安装过程中的 debug log。安装过程中可以关注一下 log,可能包含需要添加到.bash_profile 或者 .zshrc 里面环境变量。
Linux
进入 gdk 文件夹,运行下面命令:
bashgdk_debug=true make bootstrap
如果你使用的不是国外常见的发行版(Ubuntu, Debian, Arch, Fedora),比如说 Deepin,bootstrap 会失败,说不认识 Deepin,此时需要在gdk/support/bootstrap-common.sh:28附近的SUPPORTED_LINUX_PLATFORMS中新增行:['deepin']='Deepin' \.
安装配置 gdk
MacOS
如果是 M1 芯片的 mac,需要配置一下环境变量到.bash_profile 或者 .zshrc
bash1export PKG_CONFIG_PATH="$(brew --prefix)/opt/libffi/lib/pkgconfig:$PKG_CONFIG_PATH"
2export PKG_CONFIG_PATH="$(brew --prefix)/opt/icu4c/lib/pkgconfig:$PKG_CONFIG_PATH"
3export LDFLAGS="$LDFLAGS:-L$(brew --prefix)/opt/libffi/lib"
4export CPPFLAGS="-I/opt/homebrew/opt/libffi/include"
5export CPATH=$(brew --prefix)/include
6export LIBRARY_PATH=$(brew --prefix)/lib
7export LD_LIBRARY_PATH=$(brew --prefix)/lib
8export GIT_APPEND_BUILD_OPTIONS=LIBPCREDIR=$(brew --prefix)/opt/pcre2
首先需要安装 gitlab-development-kit gem,这个 gem 包含了 gdk 可执行命令。
jsxgem install gitlab-development-kit
接下来就是 clone gitlab repo, 时间较长耐心等待, 同时配置运行 gitlab 的其他组件。
jsxgdk install gitlab_repo=git@gitlab.com:gitlab-jh/jh-team/gitlab.git gdk_debug=true
repo git@gitlab.com:gitlab-jh/jh-team/gitlab.git 是极狐团队专用给 upstream 提交 MR 的,具体请参考 这个 ppt
在 gdk install 的过程中,如果碰到错误,首先请不要慌!不要慌!不要慌!:)
仔细查看错误的 log,在这里看下有没有解决方案:常见问题收集。
如果运气不好没找到,那么就试试 gdk update,有时候可能就自动 fix 了
bashgdk update gdk_debug=true
如果还是不行,考虑发消息求助其他极狐的小伙伴,或者找你的 buddy 帮你:)
Linux
确认你的系统的 inotify 足够大,因为 webpack 和 IDE 都会使用它:
bashsysctl fs.inotify
如果 inotify 低于 10 万的话,运行下列命令并重启系统:
bashecho fs.inotify.max_user_watches=100000 | sudo tee -a /etc/sysctl.conf && sudo sysctl -p
在 gdk 目录下运行命令:
bashgdk install gitlab_repo=git@gitlab.com:gitlab-jh/jh-team/gitlab.git gdk_debug=true
遇到问题时请仔细查看错误的 log,在这里看下有没有解决方案:常见问题收集。
启动 gitlab
可以使用 gdk 的命令来启动 gitlab 和其他组件
bashgdk start #启动所有组件,
gdk tail #查看所有组件的 log
gdk stop #停止所有组件
gdk status #查看组件运行状态
#更多命令请运行 gdk 查看帮助
在正确启动的环境之后,命令 gdk status 应该输出所有组件都是run状态的 log,如果有down的组件,请运行 gdk tail xxx 具体查看 log
bash1run: /Users/.../services/gitlab-workhorse: (pid 88242) 417s, normally down; run: log: (pid 87924) 418s
2
3run: /Users/.../services/postgresql: (pid 87928) 418s, normally down; run: log: (pid 87919) 418s
4
5run: /Users/.../services/praefect: (pid 88235) 417s, normally down; run: log: (pid 87921) 418s
6
7run: /Users/.../services/praefect-gitaly-0: (pid 88236) 417s, normally down; run: log: (pid 87923) 418s
8
9run: /Users/.../services/rails-background-jobs: (pid 88243) 417s, normally down; run: log: (pid 87925) 418s
10
11run: /Users/.../services/rails-web: (pid 88245) 417s, normally down; run: log: (pid 87920) 418s
12
13run: /Users/.../services/redis: (pid 88087) 418s, normally down; run: log: (pid 87922) 418s
14
15run: /Users/.../services/sshd: (pid 88246) 417s, normally down; run: log: (pid 87918) 418s
16
17run: /Users/.../services/webpack: (pid 88244) 417s, normally down; run: log: (pid 87926) 418s
创建 main-jh 分支
在后期的开发过程中,我们经常需要同时修改 GitLab repo 和 JiHu GitLab repo 的代码,所以我推荐大家在 GitLab repo 中添加极狐 GitLab 源,这样可以更方便的向 GitLab 和极狐 GitLab 提交代码。
有两个主要的分支:
一个是 master,是专门往 upstream gitlab 提交代码用的分支,指向 GitLab 源
一个是 main-jh,是专门给极狐程序员用的分支,指向极狐 GitLab 源
类似下面的效果
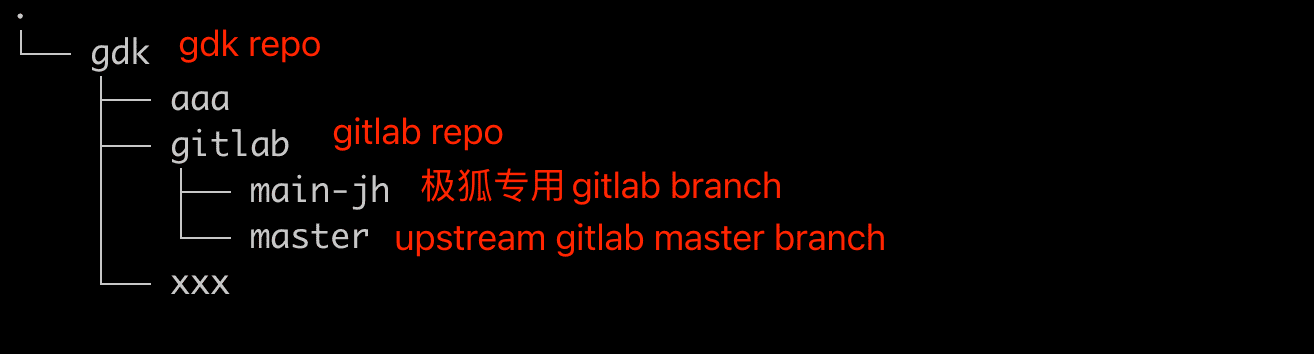
我们执行完 gdk install 之后,就有了 master 分支(指向 upstream gitlab),然后再使用下面的命令创建 main-jh 分支
bash1git remote add jh git@jihulab.com:gitlab-cn/gitlab.git # 添加 jh 源
2git fetch jh # pull 所有 jh 源的分支
3git switch -c main-jh jh/main-jh # 创建 main-jh 分支,并指向 jh 源
4
5#验证一下
6git remote -v
7# jh	git@jihulab.com:gitlab-cn/gitlab.git (fetch)
8# jh	git@jihulab.com:gitlab-cn/gitlab.git (push)
9# origin	git@gitlab.com:gitlab-jh/jh-team/gitlab.git (fetch)
10# origin	git@gitlab.com:gitlab-jh/jh-team/gitlab.git (push)
11
12git checkout master && git status -sb
13# master...origin/master 说明 master 指向 origin 源,也就是 gitlab.com
14
15git checkout main-jh && git status -sb
16# main-jh...jh/main-jh 说明 main-jh 指向 jh 源,也就是 jihulab.com
17
18#下载依赖
19bundle install
20yarn install
在 main-jh 分支中,因为有极狐自己的代码 (存放在 jh 目录中),需要注意:
- 因为 gitlab/jh 文件夹下有极狐自己用的 Gemfile,所以在启动 rails server 的时候,如果发现有类似“找不到 tencentcloud-sdk-common gem” 的错误,需要在 gitlab/.bundle/config 里面添加BUNDLE_GEMFILE: "jh/Gemfile",保证 jh/Gemfile 能正确加载
- 在执行 gdk update 的时候,当在 gitlab 目录下切换至 master 分支时,确保该目录中没有 jh 子目录。原因是在 gdk update 的时候需要确保没有任何 极狐 的代码被执行,也需要注释掉在 gitlab/.bundle/config 里面BUNDLE_GEMFILE: "jh/Gemfile", 确保 gdk update 顺利完成。可以添加下面的 bash_function 到你的 shell 中,通过 jh_gemfile 和 gl_gemfile 添加/删除 gitlab/.bundle/config 里面 BUNDLE_GEMFILE的内容,这两个方法在 gitlab repo 和 gitlab 上层的 gdk repo 都可以调用。 每次新打开都可用的话,则复制下面的代码到 ~/.bash_profile 或者 ~/.zshrc
text1function jh_gemfile () {
2  pwd=$(pwd)
3  current_dir=`basename $pwd`
4  if [ $current_dir != 'gdk' ] && [ $current_dir != 'gitlab' ]
5  then
6    echo 'run this in gitlab or gdk folder'
7    return -1
8  fi
9  if [[ -d gitlab ]]
10  then
11    bundle_file="./gitlab/.bundle/config"
12  else
13    bundle_file="./.bundle/config"
14  fi
15  echo '---\nBUNDLE_SET: "without production"\nBUNDLE_JOBS: "5"\nBUNDLE_GEMFILE: "jh/Gemfile"' > $bundle_file
16  echo "ADD jh/Gemfile in bundle/config"
17}
18
19function gl_gemfile () {
20  pwd=$(pwd)
21  current_dir=`basename $pwd`
22  if [ $current_dir != 'gdk' ] && [ $current_dir != 'gitlab' ]
23  then
24    echo 'run this in gitlab or gdk folder'
25    return -1
26  fi
27  if [[ -d gitlab ]]
28  then
29    bundle_file="./gitlab/.bundle/config"
30  else
31    bundle_file="./.bundle/config"
32  fi
33  echo '---\nBUNDLE_SET: "without production"\nBUNDLE_JOBS: "5"\n' > $bundle_file
34  echo "REMOVE jh/Gemfile in bundle/config"
35}
-
对于第2点,除了使用上述 sh 脚本手动切换外,也可使用 git hook 在切换分支时自动处理好BUNDLE_GEMFILE配置:
-
检查自己~/.gitconfig里的templatedir配置的目录,比如是 templatedir = ~/.git_template
-
把如下script内容
bash1pwd=$(pwd) 2current_dir=$(basename $pwd) 3if [ $current_dir == 'gdk' ] || [ $current_dir == 'gitlab' ]; then 4 if [[ -d gitlab ]]; then 5 bundle_file="./gitlab/.bundle/config" 6 else 7 bundle_file="./.bundle/config" 8 fi 9 10 GEMFILE="jh/Gemfile" 11 if [[ -f "$GEMFILE" ]] || [[ -f "gitlab/$GEMFILE" ]]; then 12 echo "---\nBUNDLE_SET: \"without production\"\nBUNDLE_JOBS: \"5\"\nBUNDLE_GEMFILE: \"$GEMFILE\"" >$bundle_file 13 echo "ADD $GEMFILE in bundle/config" 14 else 15 echo '---\nBUNDLE_SET: "without production"\nBUNDLE_JOBS: "5"\n' >$bundle_file 16 echo "REMOVE $GEMFILE in bundle/config" 17 fi 18fi加入到第1步中确定的~/.git_template/hooks/post-checkout文件内,或者加入到项目下的:gitlab/.git/hooks/post-checkout文件内,即可。
注意:上面两种方式都可行,区别在于后者只影响 gitlab 目录自身,前者是全局配置,会影响到你 HOME 目录下所有 git 目录。还有一点要小心,前者的全局git hook中如果加入了其他内容,在 gitlab 目录下执行切换分支的操作时,全局hook配置会自动同步写入项目下的hook。
-
-
完工。去gdk/gitlab目录下切换分支试试看吧。
设置本地网络
当前是使用 http://localhost:3000 启动访问服务,设置本地网络后则可以使用 http://gdk.test:3000 请参照一下 这个文档 设置本地网络参数
设置之前请运行 gdk stop 暂停所有组件,如果设置完成后发现有访问不到 rails 服务或者 webpack 服务的情况,你需要把你的开发域名设置成不走代理,然后重新尝试
登录 root 用户
设置完成后,访问 gdk.test:3000,登录 root/5iveL!fe
搭建成功!激动!撒花!
申请 gitlab license 激活 gitlab 服务
拿到 License 后,在对应环境下,登录 root,点击 Menu → Admin → Settings → General → License file,上传即可。
运行本地测试
光登录成功还不够,还要能正确运行测试。推荐使用 rubymine 运行测试,介绍一下如何配置 rubymine rspec 的:
- 使用 rubymine 打开 gitlab repo,注意不是 gdk repo
- 选择 Edit Configuration,
- 点击左下角的Edit configurations templates
- 选择 rspec,在 Environment Variables 中添加 BUNDLE_GEMFILE=jh/Gemfile
- 然后打开一个测试文件,比如 terms_helper_spec.rb,运行测试,验证结果
- 其实在 gitlab repo 下运行 bundle exec rspec xxx_spec.rb 也可以。 例如 bundle exec rspec spec/models/users_statistics_spec.rb
Debug GitLab Rails Server
有时候我们需要 debug gitlab rails 来帮助我们更好地理解原有逻辑,具体如下:
-
暂停 gdk 管理的 rails 服务,gdk stop rails-web
-
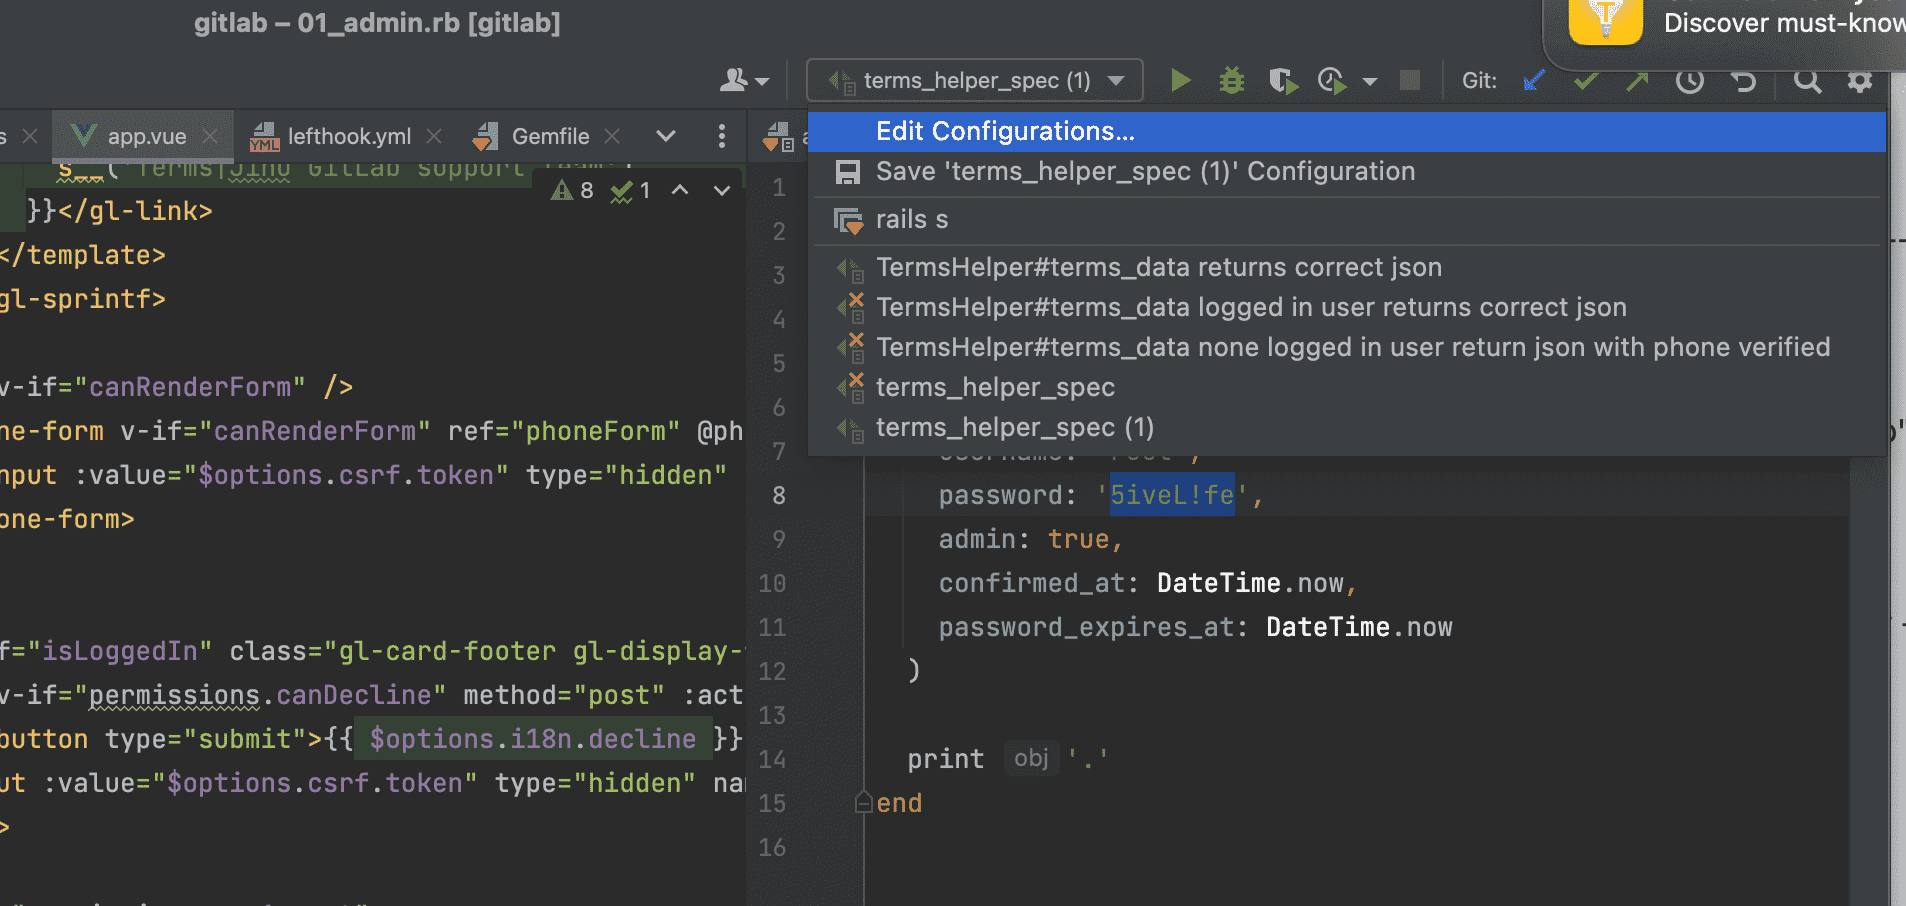
打开 rubymine,选择 Edit Configuration(类似“运行本地测试”章节)
-
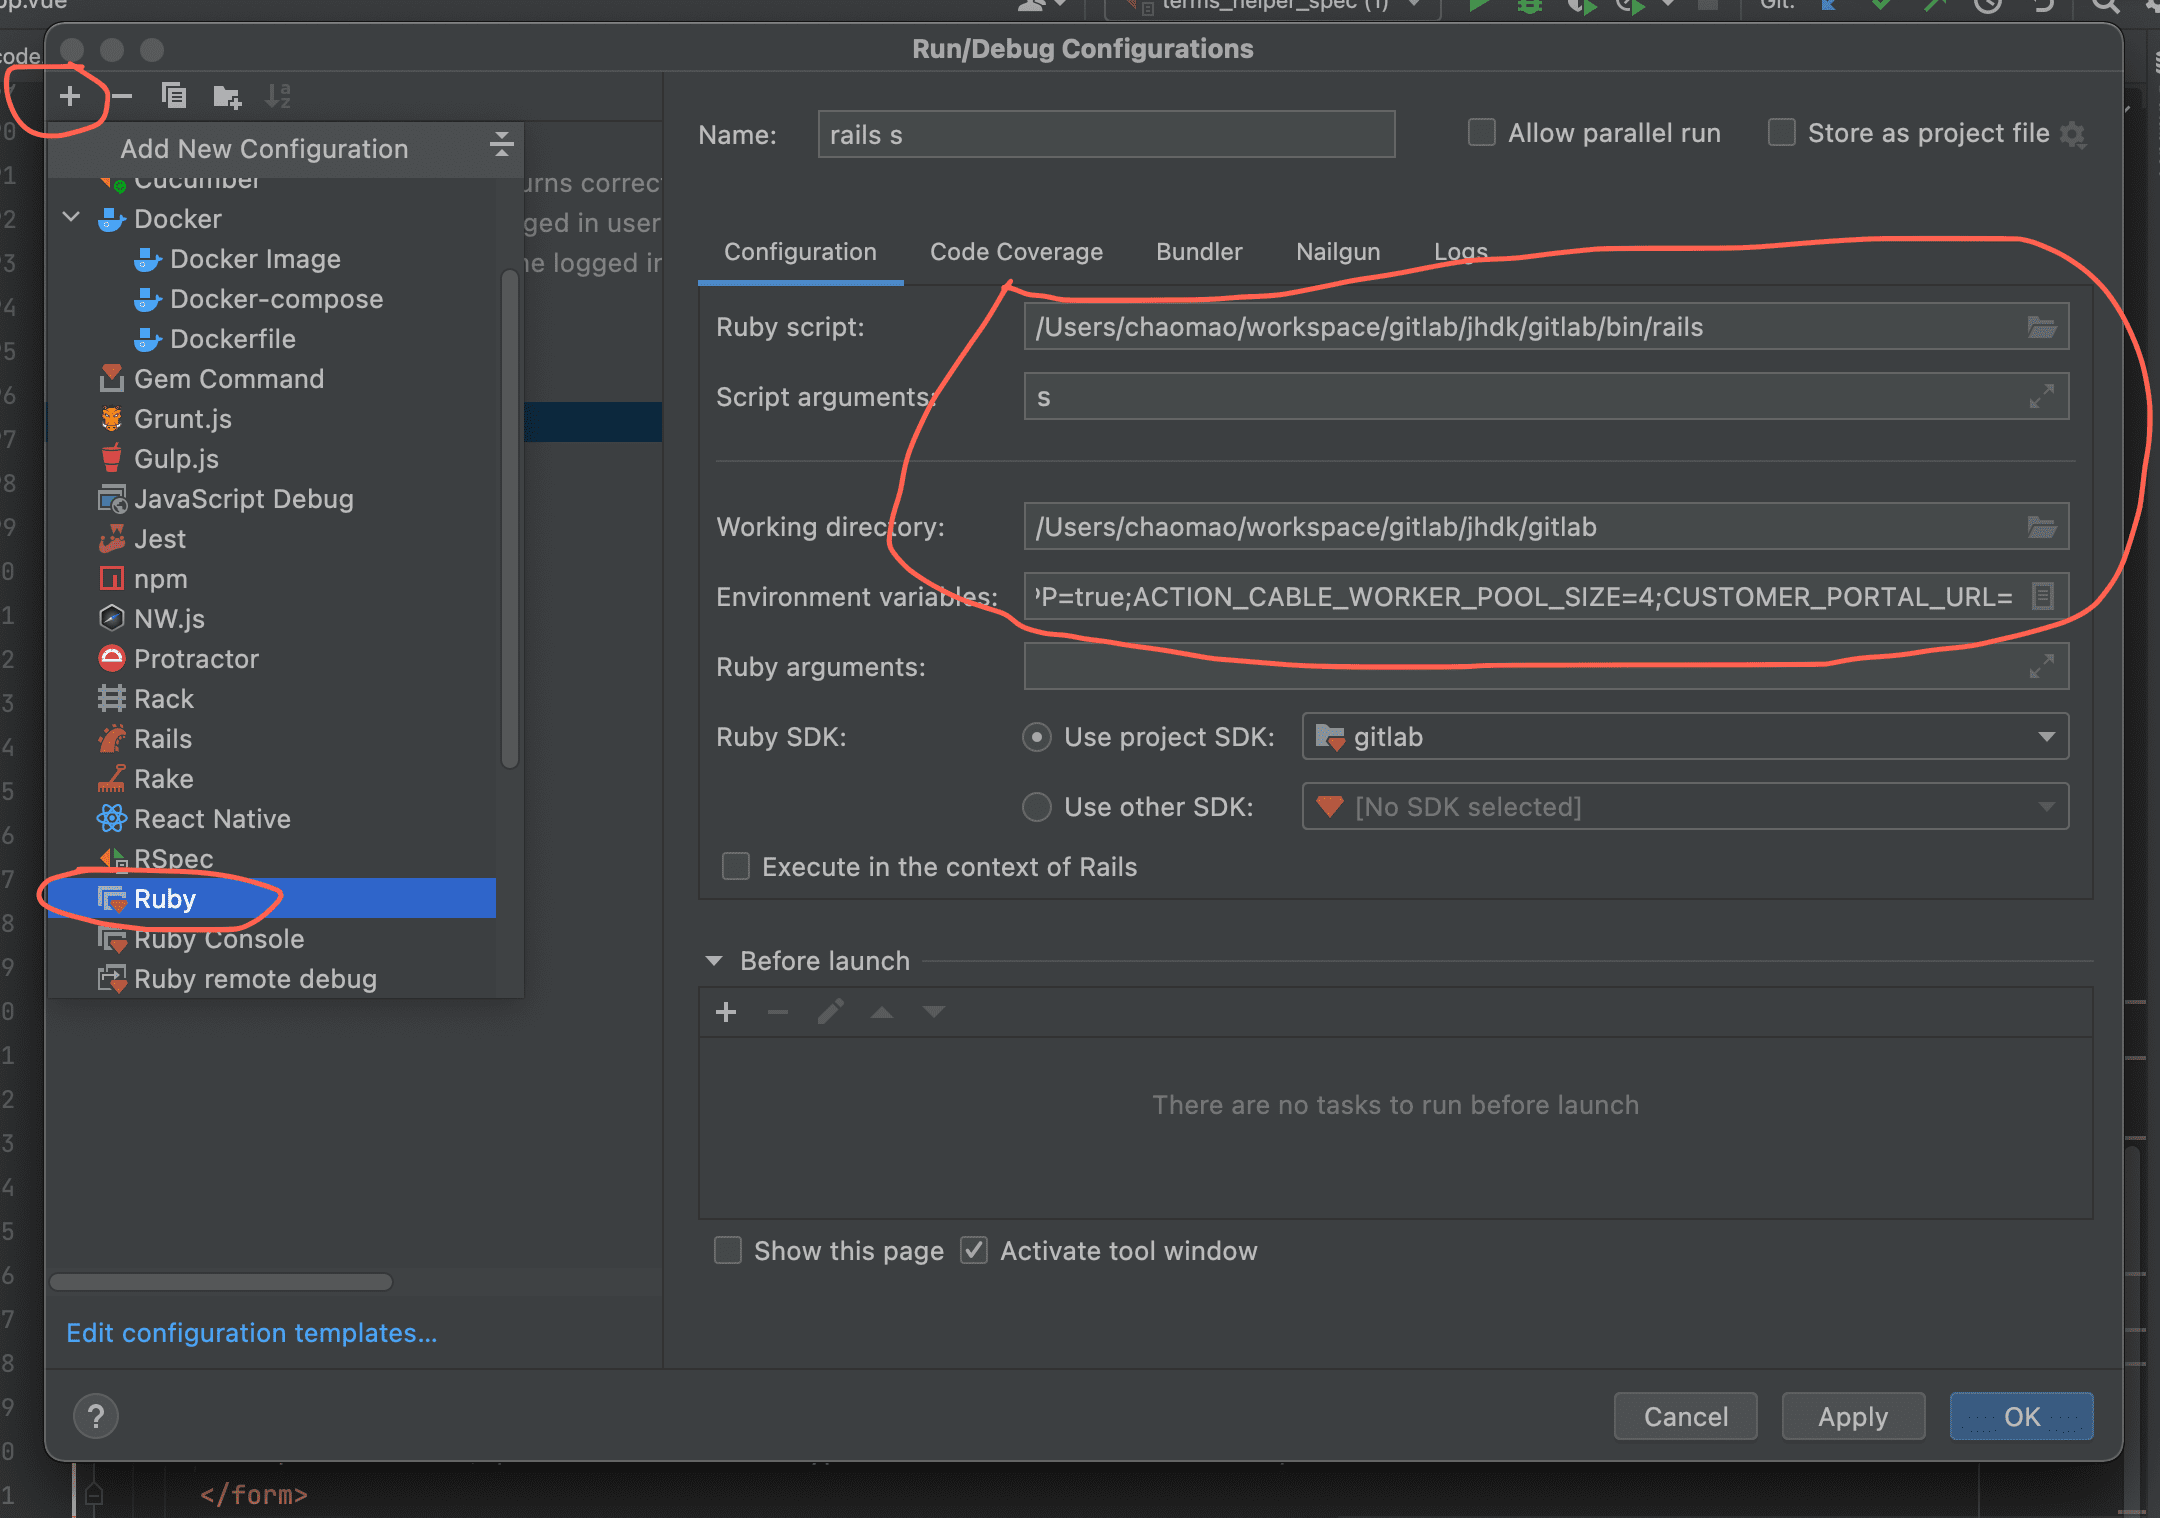
新增一个 ruby 启动项,添加以下内容
- ruby scripts: [gitlab-repo-path]/bin/rails
- script arguments: s
- working directory: [gitlab-repo-path]
- Environment Variable:
bashENABLE_BOOTSNAP=true;RAILS_ENV=development;ACTION_CABLE_IN_APP=true;ACTION_CABLE_WORKER_POOL_SIZE=4;CUSTOMER_PORTAL_URL=http://gdk.test:5000
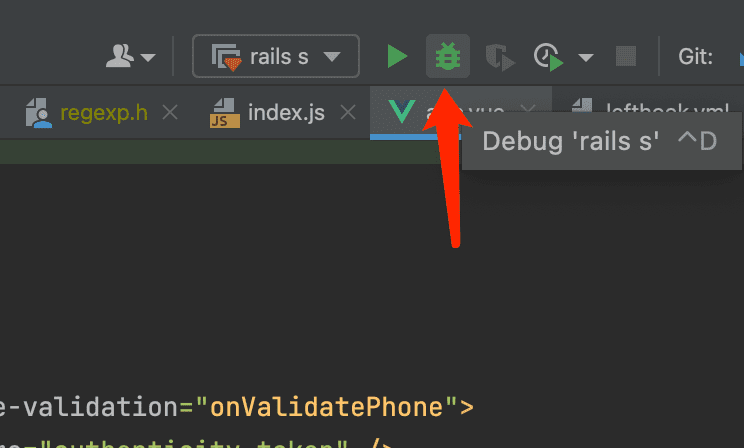
- 选择刚才添加的启动项,点击 debug 即可,
有另一个简单的方法,就是使用 gdk thin,它会停止使用 puma 来启动 rails,然后起一个 thin 的 server,这样就可以使用 binding.pry 来打断点调试了
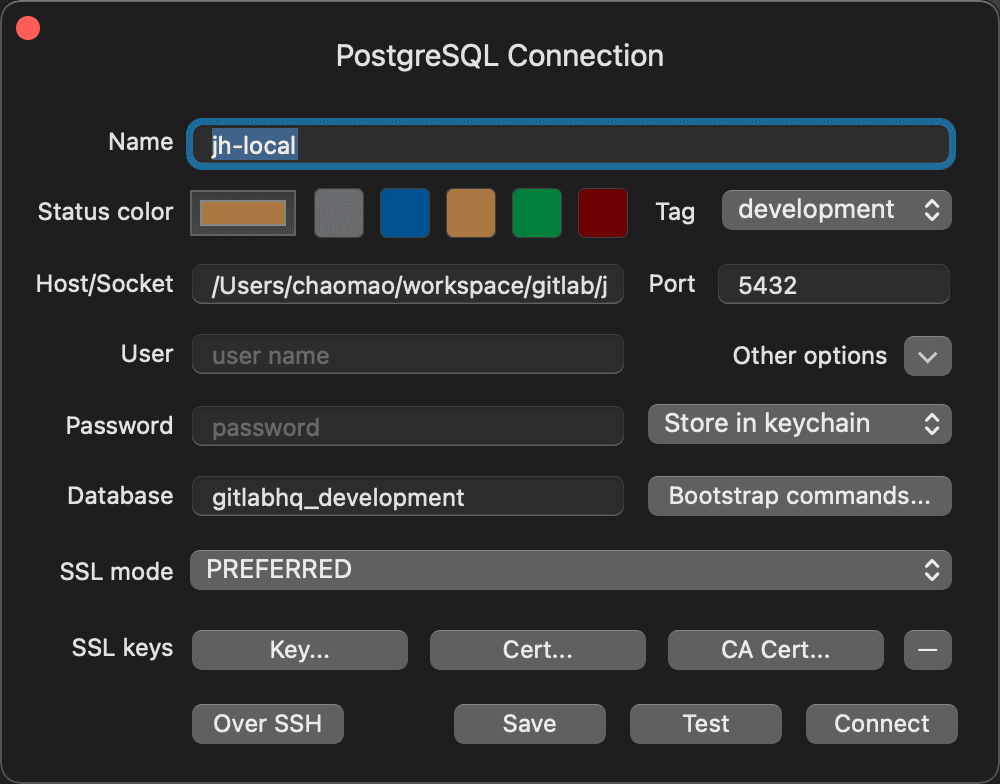
使用 Table+ 查看数据库
不会连接数据库的程序员不是好程序员:)
- 下载 table+, https://tableplus.com/, 试用版免费,正式版需要申请 license
- 添加新的连接,选择 postgres
- 在 Host/Socket 中填入 gdk/postgresql 的文件夹地址,比如 /Users/chaomao/workspace/gdk/postgresql. 或者查看gitlab/config/database.yml本地数据库的具体连接情况.
- port 填入 5432 , database 填入 gitlabhq_development
- 点击 Test 测试连接,connect 保存连接配置
运行功能测试
- 保证 chromedriver 不会被苹果系统安全相关设置阻挡,在 terminal 里面运行 chromedriver 命令,确保能正确启动
- 在 terminal 里面删除 proxy 相关的环境变量,取消科学上网的全局代理模式
- 运行测试需要依赖 webpack,请运行 gdk start,同时 webpack 默认会延迟编译 js 文件,所以第一次运行测试会 fail,第二次运行就 pass 了
- 推荐运行这个测试验证 bundle exec rspec ee/spec/features/epic_boards/epic_boards_spec.rb
运行前端单元测试
- 确保 yarn install 安装成功
- 运行 yarn jest 会执行全量前端单元测试,如果需要单独执行某个测试文件可以运行 yarn jest spec/frontend/xx/xx_spec.js
- 如果需要调试某个前端单元测试,先在该测试文件中加入 debugger 语句,然后执行 yarn jest-debug spec/frontend/xx/xx_spec.js ,最后打开 chrome 浏览器访问 chrome://inspect 进行调试即可
Elasticsearch 环境安装和配置
Gitlab 的 Advanced Search(高级搜索)功能需要 elasticsearch 环境的支持,详细说明可参看官方文档。要启用它需要:
- elasticsearch 环境的支持;
- 在 Gitlab 中开启和配置,参考这里的文档操作,并生成 elasticsearch index;
- 用户 license 需要 PREMIUM 以上;
elasticsearch index 就类似于数据库中的表,数据是存在 index 中的。如果 index 不能正确生成,则搜索页面查询结果都为空的。
本地开发环境下,参照 gdk 这个 how to 文档来安装、启动 elasticsearch。
本地可使用 Elasticsearch Head 这个 chrome extension 来管理:

然后,开发环境下的 elasticsearch index 是通过 rake task 来做的(bundle exec rake gitlab:elastic:index),但 how to 文档里没提到的:
- 一定要先导入 license 成为 Ultimate 版本!然后再去 run rake task,因为即使你 license 为 Free 也是可以 run 的, rake 运行时不会报任何 license 不够的问题,而且生成 0 条数据的打印结果让你看起来也以为是成功的,实际上却没有。
- 一定要启动 sidekiq,因为生成 index(不管用 rake 还是在后台页面上点击操作)都是靠 sidekiq 在后台去跑的,否则会在 Head 里看到数据(doc)始终为 0 条;
另外,官方文档里也列举了一些常见的问题,可以参考下。
常见问题收集
-
这是 Upstream 整理的安装问题,先去找下你遇到的问题在不在此: Troubleshooting GDK
-
缺少依赖。这是最常见的错误,一定要仔细看日志。有些日志比较隐蔽,比如:
textERROR: 'support/exec-cd gitlab bundle exec rake dev:setup' failed. Retrying in 2 secs..手动执行它,才看到了缺少 view_component 和 pg 的依赖:
bash$ support/exec-cd gitlab bundle exec rake dev:setup
Could not find view_component-2.61.0, pg-1.4.1 in any of the sources
Run `bundle install` to install missing gems.
3. 安装 asdf 前不应该配置这些环境变量,否则可能会出现问题:
text```
clang: clang: error: linker command failed with exit code 1 (use -v to see invocation)
error: linker command failed with exit code 1 (use -v to see invocation)
```
4. 报错 local error: tls: bad record MAC。
如果你用 ClashX Pro,记得打开增强模式(其他代理工具类似),否则可能出现某些请求不走代理的情况,会报此错误。
-
报错 LoadError:re2/lib/libre2.9.dylib。
textLoadError: dlopen(/Users/xxx/.asdf/installs/ruby/2.7.7/lib/ruby/gems/2.7.0/gems/re2-1.6.0/lib/re2.bundle, 0x0009): Library not loaded:'/opt/homebrew/opt/re2/lib/libre2.9.dylib'
Reason: tried : '/opt/homebrew/opt/re2/lib/libre2.9.dylib' (no such file), '/usr/local/lib/libre2.9.dylib' (no such file), 'opt/homebrew/Cellar/re2/20221201/lib/libre2.9.dylib' (no such file)
如果你用的 re2-20221201,所使用的是 libre2.10.dylib。你有两种解决方案:
- 将re2降级到20220601版本
- 将 opt/homebrew/Cellar/re2/20221201/lib/libre2.10.dylib 改为 opt/homebrew/Cellar/re2/20221201/lib/libre2.9.dyli
- 将re2降级到20220601版本
-
Webpack 异常退出。
很难受,错误日志(如下)只能看到 Killed,并不能看出退出的原因。后来才发现是机器内存不足导致的,从 4G 扩容到 8G,问题便被解决了。text2023-01-05_19:54:58.65897 webpack : graphql-tag enforces all fragment names across your application to be unique; read more about 2023-01-05_19:54:58.65897 webpack : this in the docs: http://dev.apollodata.com/core/fragments.html#unique-names 2023-01-05_19:55:11.46515 webpack : IncrementalWebpackCompiler: Currently compiling route entrypoints: 25 of 429 2023-01-05_19:56:47.63851 webpack : IncrementalWebpackCompiler: Have not visited pages.profiles.passwords.new recently. Adding to compilation. 2023-01-05_19:57:18.58202 webpack : Killed -
国内源代理的影响
Ruby
务必注释掉~/.bundle/confg下的设置:
text// BUNDLE_MIRROR__HTTPS://RUBYGEMS__ORG/: "https://gems.ruby-china.com"否则会报类似这样的错误:
text1Fetching source index from https://gems.ruby-china.com/
2Your bundle is locked to rails (6.1.7.1) from rubygems repository
3https://rubygems.org/ or installed locally, but that version can no longer be
4found in that source. That means the author of rails (6.1.7.1) has removed it.
5You'll need to update your bundle to a version other than rails (6.1.7.1) that
6hasn't been removed in order to install.
7make: *** [.gitlab-bundle] Error 7
8❌️ ERROR: Failed to install.
Go
务必注释掉~/.zshrc等 shell 配置中的``GOPROXY`的设置:
text# export GOPROXY=https://mirrors.aliyun.com/goproxy/否则会报类似这样的错误:
text1go: downloading go.opencensus.io v0.23.0 2go: downloading github.com/golang/groupcache v0.0.0-20210331224755-41bb18bfe9da 3internal/gitaly/gitaly.go:12:2: gitlab.com/gitlab-org/gitaly/v15@v15.4.0-rc2: reading https://mirrors.aliyun.com/goproxy/gitlab.com/gitlab-org/gitaly/v15/@v/v15.4.0-rc2.zip: 404 Not Found 4internal/gitaly/gitaly.go:13:2: gitlab.com/gitlab-org/gitaly/v15@v15.4.0-rc2: reading https://mirrors.aliyun.com/goproxy/gitlab.com/gitlab-org/gitaly/v15/@v/v15.4.0-rc2.zip: 404 Not Found 5internal/gitlabnet/accessverifier/client.go:8:2: gitlab.com/gitlab-org/gitaly/v15@v15.4.0-rc2: reading https://mirrors.aliyun.com/goproxy/gitlab.com/gitlab-org/gitaly/v15/@v/v15.4.0-rc2.zip: 404 Not Found 6make[1]: *** [bin/gitlab-shell] Error 1 7make: *** [gitlab-shell-setup] Error 2 8❌️ ERROR: Failed to install. -
main-jh 分支安装Gem报错
gpgme 安装报错
报类似如下错误:
textgpgme gem uses locally built versions of required C libraries, namely libgpg-error, libassuan, and gpgme.解决方法:执行如下命令,然后再bundle install
textbundle config --local build.gpgme --use-system-librariesrugged 安装报错
报类似如下错误:
textclang: error: no such file or directory: ':-L/opt/homebrew/opt/libffi/lib'解决方法:修改之前加入~/.zshrc等shell配置中的如下设置
textexport LDFLAGS="$LDFLAGS:-L$(brew --prefix)/opt/libffi/lib" 改为 export LDFLAGS="-L$(brew --prefix)/opt/libffi/lib"然后再bundle install
-
yarn jest 测试缺少 fixtures 报错
- 确保本地 gdk start 成功
- gitlab 目录下执行 bin/rake frontend:fixtures (会很慢,10分钟左右,不过生成一次后就不需要再执行了)
- 重新执行 yarn jest spec/frontend/xx/xx_spec.js
-
webpack 热重载(live_reload/hot reload)无效
正常情况下,GDK 会默认开启 webpack-dev-server 的 HMR 功能,如果您的 GDK 环境前端文件修改(特指 *.vue/*.js 文件)无法正常触发 HMR,可以按照以下顺序进行排查:
- 打开 gdk.yml 配置文件(位于 gitlab-development-kit 根目录下)。
- 检查是否存在以下 webpack 配置项:
- enabled:该配置为 false 时将禁用 webpack。
- static:该配置为 true 时将使用 Ruby server 替换 webpack-dev-server,前端资源将只会在启动 GDK 时编译一次。
- live_reload:该配置为 false 将禁用 webpack 热更新。
- sourcemaps:该配置为 false 将禁用 webpack-dev-server 生成 sourcemap,导致 debug 出现异常。
- 如果存在以上配置项,简单处理可以删除您的 webpack 下除了 host 和 port 以外的所有配置项,改用默认配置。
- 删除配置项后,执行 gdk reconfigure。
- 重启 GDK:gdk start。
如果重启后仍然无效,或是您的 gdk.yml 文件中并未添加 webpack 配置:
- 进入 gitlab-development-kit/gitlab/public 目录。
- 检查该路径下是否存在 assets 文件夹。
- 如果存在,删除该 assets 文件夹后重启 GDK 即可。
最后
- 欢迎大家提 MR 维护这个文档
- 如有其它问题,请首先联系你的 buddy,或者加入 slack channel #gitlab-dev-env-setup 提问