- 架构概览
- 用于多个节点的 Redis 和 PostgreSQL
- 先决条件:两个独立工作的极狐GitLab 多节点站点
- 将极狐GitLab 站点配置为 Geo 主要站点
- 将另一个极狐GitLab 站点配置为 Geo 次要站点
多节点 Geo
本文档描述了在多节点配置中运行 Geo 的最小参考架构。如果您的多节点设置与所描述的不同,则可以根据您的需要调整这些说明。
架构概览
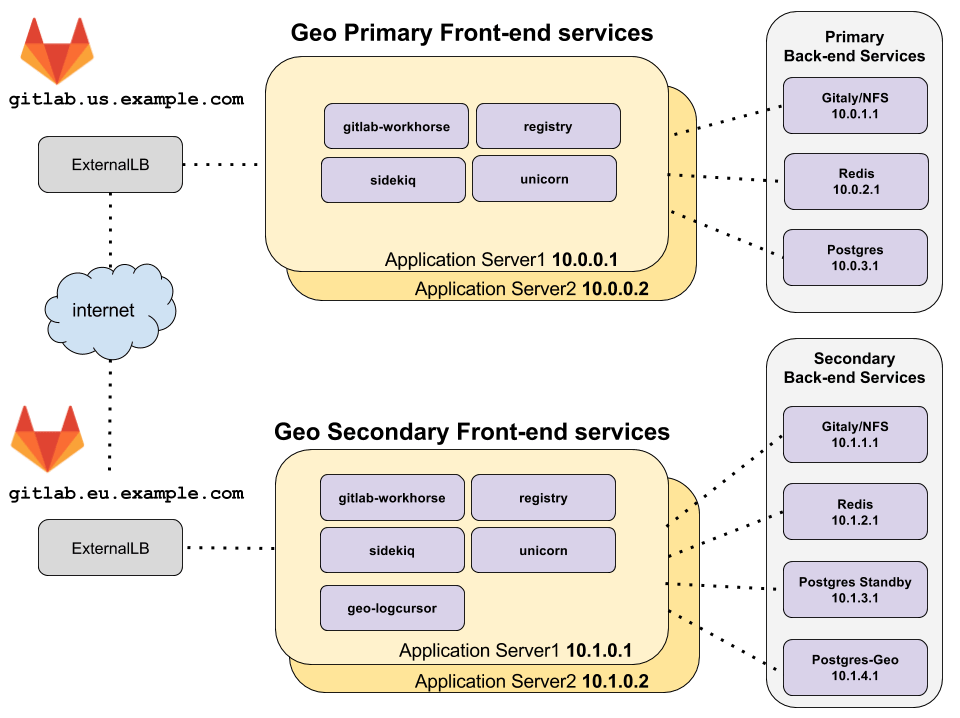
上面的拓扑假设主要和次要 Geo 站点位于两个不同的位置,在它们自己的具有私有 IP 地址的虚拟网络上。网络的配置使得一个 Geo 位置的所有机器都可以使用它们的私有 IP 地址相互通信。 给出的 IP 地址是示例,可能会因部署的网络拓扑而有所不同。
访问这两个 Geo 站点的唯一外部方式是通过 HTTPS 访问上例中的 gitlab.us.example.com 和 gitlab.eu.example.com。
用于多个节点的 Redis 和 PostgreSQL
由于为 PostgreSQL 和 Redis 设置此配置涉及额外的复杂性,因此此 Geo 多节点文档未涵盖它。
先决条件:两个独立工作的极狐GitLab 多节点站点
一个极狐GitLab 站点用作 Geo 主要站点。 您可以为每个 Geo 站点使用不同的架构大小。如果您已经有一个正在使用的工作极狐GitLab 实例,它可以用作主要站点。
第二个极狐GitLab 站点用作 Geo 次要站点。 登录并测试它是个好主意。但是,请注意,在从主要站点复制过程中,它的数据会被清除。
将极狐GitLab 站点配置为 Geo 主要站点
以下步骤使极狐GitLab 站点可以用作 Geo 主要站点。
步骤 1. 配置主要前端节点
-
编辑
/etc/gitlab/gitlab.rb并添加以下内容:## ## The unique identifier for the Geo site. See ## https://docs.gitlab.com/ee/administration/geo_nodes.html#common-settings ## gitlab_rails['geo_node_name'] = '<site_name_here>' ## ## Disable automatic migrations ## gitlab_rails['auto_migrate'] = false
进行这些更改后,重新配置极狐GitLab,使更改生效。
步骤 1. 将站点定义为主要站点
-
在前端节点之一执行以下命令:
sudo gitlab-ctl set-geo-primary-node
将另一个极狐GitLab 站点配置为 Geo 次要站点
次要站点类似于任何其他极狐GitLab 多节点站点,具有三个主要区别:
- 主 PostgreSQL 数据库是 Geo 主要站点的 PostgreSQL 数据库的只读副本。
- 每个 Geo 次要站点都有一个额外的 PostgreSQL 数据库,称为 “Geo 跟踪数据库”,它跟踪各种资源的复制和验证状态。
- 有一个额外的极狐GitLab 服务
geo-logcursor。
因此,我们一一设置多节点组件,并包括与正常多节点设置的偏差。但是,我们强烈建议首先配置一个全新的极狐GitLab 站点,不是 Geo 的一部分,允许验证它是一个工作的极狐GitLab 站点。只有这样才能将其修改为 Geo 次要站点。这有助于将 Geo 设置问题与不相关的多节点配置问题分开。
第 1 步:在 Geo 次要站点上配置 Redis 和 Gitaly 服务
配置以下服务:
- 为多个节点配置 Redis。
- Gitaly,它存储从 Geo 主要站点同步的数据。
第 2 步:配置 PostgreSQL 流复制
遵循 Geo 数据库复制说明。
如果使用外部 PostgreSQL 实例,另请参阅 Geo 与外部 PostgreSQL 实例。
第 3 步:在 Geo 次要站点上配置 Geo 跟踪数据库
如果要在多节点 PostgreSQL 集群中运行 Geo 跟踪数据库,请按照为跟踪 PostgreSQL 数据库配置 Patroni 集群文档。
如果要在单个节点上运行 Geo 跟踪数据库,请按照以下说明进行操作。
-
为极狐GitLab 应用程序用于访问跟踪数据库的数据库用户生成所需密码的 MD5 哈希:
用户名(默认为
gitlab_geo)被合并到哈希中。gitlab-ctl pg-password-md5 gitlab_geo # Enter password: <your_password_here> # Confirm password: <your_password_here> # fca0b89a972d69f00eb3ec98a5838484在下一步中使用此哈希值填写
<tracking_database_password_md5_hash>。 -
在要运行 Geo 跟踪数据库的机器上,将以下内容添加到
/etc/gitlab/gitlab.rb:## ## Enable the Geo secondary tracking database ## geo_postgresql['enable'] = true geo_postgresql['listen_address'] = '<ip_address_of_this_host>' geo_postgresql['sql_user_password'] = '<tracking_database_password_md5_hash>' ## ## Configure PostgreSQL connection to the replica database ## geo_postgresql['md5_auth_cidr_addresses'] = ['<replica_database_ip>/32'] gitlab_rails['db_host'] = '<replica_database_ip>' # Prevent reconfigure from attempting to run migrations on the replica database gitlab_rails['auto_migrate'] = false
进行这些更改后,重新配置极狐GitLab,使更改生效。
如果使用外部 PostgreSQL 实例,另请参阅 Geo 与外部 PostgreSQL 实例。
第 4 步:在 Geo 次要站点上配置前端应用程序节点
在上面的最小架构图中,有两台机器运行极狐GitLab 应用程序服务。在配置中选择性地启用这些服务。
配置极狐GitLab Rails 应用程序节点,然后进行以下修改:
-
在 Geo 次要站点中的每个应用程序节点上编辑
/etc/gitlab/gitlab.rb,并添加以下内容:## ## Enable GitLab application services. The application_role enables many services. ## Alternatively, you can choose to enable or disable specific services on ## different nodes to aid in horizontal scaling and separation of concerns. ## roles ['application_role'] ## `application_role` already enables this. You only need this line if ## you selectively enable individual services that depend on Rails, like ## `puma`, `sidekiq`, `geo-logcursor`, and so on. gitlab_rails['enable'] = true ## ## Enable Geo Log Cursor service ## geo_logcursor['enable'] = true ## ## The unique identifier for the Geo site. See ## https://docs.gitlab.com/ee/administration/geo_nodes.html#common-settings ## gitlab_rails['geo_node_name'] = '<site_name_here>' ## ## Disable automatic migrations ## gitlab_rails['auto_migrate'] = false ## ## Configure the connection to the tracking database ## geo_secondary['enable'] = true geo_secondary['db_host'] = '<geo_tracking_db_host>' geo_secondary['db_password'] = '<geo_tracking_db_password>' ## ## Configure connection to the streaming replica database, if you haven't ## already ## gitlab_rails['db_host'] = '<replica_database_host>' gitlab_rails['db_password'] = '<replica_database_password>' ## ## Configure connection to Redis, if you haven't already ## gitlab_rails['redis_host'] = '<redis_host>' gitlab_rails['redis_password'] = '<redis_password>' ## ## If you are using custom users not managed by Omnibus, you need to specify ## UIDs and GIDs like below, and ensure they match between nodes in a ## cluster to avoid permissions issues ## user['uid'] = 9000 user['gid'] = 9000 web_server['uid'] = 9001 web_server['gid'] = 9001 registry['uid'] = 9002 registry['gid'] = 9002
postgresql['sql_user_password'] = 'md5 digest of secret',请记住 gitlab_rails['db_password'] 和 geo_secondary['db_password'] 包含明文密码,用于让 Rails 节点连接到数据库。postgresql['md5_auth_cidr_addresses'] 设置中,以允许该节点上的 Rails 连接到 PostgreSQL。进行这些更改后,重新配置极狐GitLab,使更改生效。
在架构概述拓扑中,在 “frontend” 节点上启用了以下极狐GitLab 服务:
geo-logcursorgitlab-pagesgitlab-workhorselogrotatenginxregistryremote-syslogsidekiqpuma
通过在前端应用程序节点上运行 sudo gitlab-ctl status 来验证这些服务是否存在。
第 5 步:为 Geo 次要站点设置 LoadBalancer
上面的最小架构图显示了每个 Geo 位置的负载均衡器,用于将流量路由到应用程序节点。
有关更多信息,请参阅具有多个节点的极狐GitLab 负载均衡器。
第 6 步:在 Geo 次要站点上配置后端应用程序节点
上面的最小架构图显示了在同一台机器上一起运行的所有应用程序服务。但是,对于多个节点,我们强烈建议单独运行所有服务。
例如,可以像上面的前端应用程序节点一样配置 Sidekiq 节点,但需要进行一些更改以仅运行 sidekiq 服务:
-
在 Geo 次要站点中的每个 Sidekiq 节点上编辑
/etc/gitlab/gitlab.rb,并添加以下内容:## ## Enable the Sidekiq service ## sidekiq['enable'] = true gitlab_rails['enable'] = true ## ## The unique identifier for the Geo site. See ## https://docs.gitlab.com/ee/administration/geo_nodes.html#common-settings ## gitlab_rails['geo_node_name'] = '<site_name_here>' ## ## Disable automatic migrations ## gitlab_rails['auto_migrate'] = false ## ## Configure the connection to the tracking database ## geo_secondary['enable'] = true geo_secondary['db_host'] = '<geo_tracking_db_host>' geo_secondary['db_password'] = '<geo_tracking_db_password>' ## ## Configure connection to the streaming replica database, if you haven't ## already ## gitlab_rails['db_host'] = '<replica_database_host>' gitlab_rails['db_password'] = '<replica_database_password>' ## ## Configure connection to Redis, if you haven't already ## gitlab_rails['redis_host'] = '<redis_host>' gitlab_rails['redis_password'] = '<redis_password>' ## ## If you are using custom users not managed by Omnibus, you need to specify ## UIDs and GIDs like below, and ensure they match between nodes in a ## cluster to avoid permissions issues ## user['uid'] = 9000 user['gid'] = 9000 web_server['uid'] = 9001 web_server['gid'] = 9001 registry['uid'] = 9002 registry['gid'] = 9002您可以类似地配置节点以仅使用
geo_logcursor['enable'] = true运行geo-logcursor服务,并使用sidekiq['enable'] = false禁用 Sidekiq。这些节点不需要连接到负载均衡器。